Rocks are the bones of most aquascapes. They establish the structure, anchor the design, and often serve as the primary focal points. Choosing the right rocks and placing them well makes the difference between a scape that feels intentional and one that feels arbitrary. Here's the complete guide to aquascaping with rocks.
Why Rocks Matter
Hardscape — rocks and driftwood — provides the architectural foundation of an aquascape. Plants come and go, grow and need trimming, but the rocks stay constant. They:
- Establish the composition's structure before any plants are placed
- Provide focal points that anchor the design
- Create depth and elevation that flat substrate can't
- Add textural contrast to plant-dominant scenes
- Define zones within the layout
- Support natural-looking environments for fish (caves, territories, hiding spots)
A scape built around great hardscape with mediocre plants will still look great. A scape with great plants but no thoughtful hardscape will always feel flat.
Common Aquascape Rocks
Several rock types dominate the modern aquascape world, each with distinct visual character:
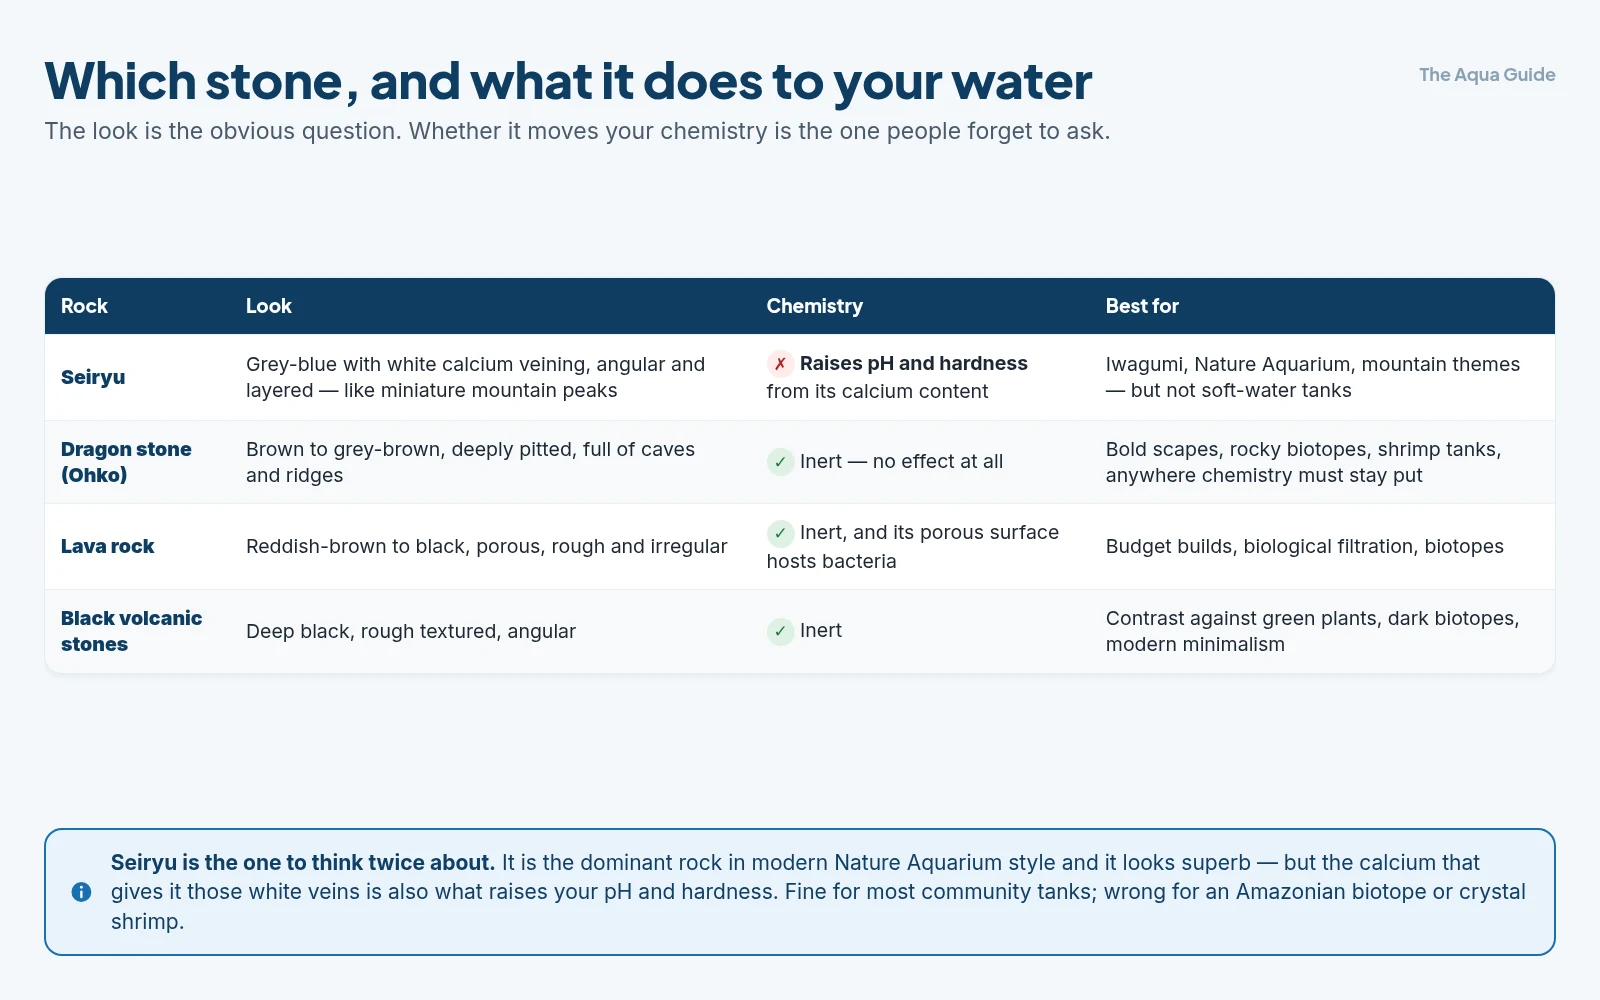
Seiryu Stone
The dominant rock in modern Nature Aquarium style. Originally from Japan; now sourced worldwide.
Look: Grey-blue with distinctive white calcium veining and angular, layered structure. Looks like miniature mountain peaks.
Pros: Dramatic appearance; classic Iwagumi material; available in many sizes.
Cons: Slightly raises water pH and hardness due to calcium content. Not ideal for soft-water tanks (Amazonian biotopes, crystal shrimp). Fine for most community tanks and African cichlid setups.
Best for: Iwagumi, Nature Aquarium, mountain-themed compositions.
Dragon Stone (Ohko Stone)
The textured, holey alternative. Distinctive porous structure with caves, holes, and dramatic ridges.
Look: Brown to grey-brown; deeply pitted and textured; often resembles mountain ranges or alien landscapes.
Pros: No effect on water chemistry (inert); dramatic visual texture; light weight; lots of natural caves for fish/shrimp.
Cons: Can be brittle; expensive; striking texture means it dominates compositions (use deliberately).
Best for: Bold scapes, biotopes featuring rocky terrain, shrimp tanks, planted tanks where chemistry must stay stable.
Lava Rock
The budget-friendly workhorse. Volcanic rock; widely available cheaply.
Look: Reddish-brown to black; porous; rough texture; irregular shapes.
Pros: Cheap; inert (no pH effect); porous surface excellent for beneficial bacteria; light; easy to drill if needed.
Cons: Can look rough/utilitarian; reddish color limits aesthetic; harder to compose with than more refined stones.
Best for: Budget builds, biological filtration support, biotope tanks.
Black Lava / Frodo Stone
The dark dramatic option. Various black volcanic stones.
Look: Deep black or near-black; rough textured surface; angular.
Pros: Strong color contrast with green plants; inert; visually dramatic.
Cons: Can dominate if overused; some varieties are quite heavy.
Best for: Contrast-driven scapes, dark biotopes, modern minimalist styles.
Mountain Stone / Yamaya Stone
The natural-looking variety. Mountain rocks with neutral tones and natural shapes.
Look: Grey-brown to tan; rounded but slightly textured; natural appearance.
Pros: Inert; natural look; good for biotope and naturalistic scapes.
Cons: Less visually striking than seiryu or dragon stone.
Best for: Naturalistic scapes, riverside biotopes, beginner-friendly hardscape.
Slate
The flat layered option. Sedimentary rock that splits into flat slabs.
Look: Grey to dark grey; flat layered slabs; can be stacked.
Pros: Inert; stacks easily for caves; flat surfaces for cichlid breeding.
Cons: Limited shape variation; can look architectural rather than natural.
Best for: Cichlid tanks, cave structures, layered/stratified looks.
Pagoda Rock
Stacked-layer appearance. Has natural stratified bands.
Look: Reddish-brown layers; can resemble miniature pagodas or eroded landscapes.
Pros: Distinctive striped appearance; inert; natural-looking.
Cons: Brown tones limit color palette options.
Best for: Natural rocky biotopes, scapes with warm earth tones.
River Rocks / Smooth Stones
The everyday option. Smooth rounded rocks from rivers or beaches.
Look: Smooth, rounded, varied colors.
Pros: Cheap or free; inert (mostly); natural; safe for fish.
Cons: Less visually striking than specialized aquascape rocks; can look common.
Best for: Beginners; biotope scapes; natural stream-bed looks.
Testing Rocks for Aquarium Safety
Before adding any rock from outside an aquarium store:
Vinegar test for calcium content. Drop a few drops of white vinegar on the rock. If it fizzes, the rock contains calcium carbonate and will raise pH/hardness. Use only in tanks where you want that effect (African cichlids, hardwater species), or avoid.
Visual inspection. Avoid:
- Rocks with metallic veins or rust spots (heavy metals leaching)
- Rocks with sharp jagged edges that could harm fish
- Crumbly or flaking rocks (chemicals leaching, debris in water)
- Rocks of unknown geological origin (better safe than sorry)
Boiling/scrubbing. Scrub thoroughly with a brush under running water; some keepers boil rocks for 15+ minutes to sterilize. Skip boiling for some types (lava can explode if it has water trapped inside).
Soaking test. Put new rocks in a bucket of water for a few days, then test the water. Significant pH or hardness change means the rock affects chemistry.
Composition Principles for Rock Placement
The principles from the composition guide apply directly:
Use odd numbers. Iwagumi tradition uses 3, 5, or 7 rocks. Odd numbers feel more natural and less symmetric than even numbers. A scape with 2 large rocks often looks balanced-but-static; 3 same-sized rocks looks much more dynamic.
One dominant stone. Your largest rock — the "primary stone" or "Oyaishi" in Japanese tradition — should be visually dominant. Other rocks support and balance it.
Position the dominant stone off-center. Apply rule of thirds — the primary stone goes at one of the upper or lower thirds positions, not the center.
Angle stones deliberately. Stones rarely sit perfectly upright in nature. Slight tilts, especially in the direction of "flow" you want to suggest, look more natural. Imagine a stone tilted as if a river had pushed it.
Cluster stones with intent. Don't space them evenly; cluster them in groups, with one or two solo. Imagine geological forces — stones don't fall in perfect grids.
Lead the eye. Use rock placement to direct attention. A stone leaning toward the focal point reinforces it; a stone leaning away leads the eye out.
Vary heights and sizes. A scape with three identically-sized rocks looks unintentional. Use one large, one medium, one small (the "Iwagumi triangle").
Plant burying the bases. Plants growing around the bottoms of rocks make them look planted in the substrate, not perched on top. Plan for plants to grow into these spaces.
At a glance: the Iwagumi arrangement
| Stone | Its job |
|---|---|
| Oyaishi — the parent stone | The largest and dominant rock. Placed at a rule-of-thirds point, often slightly inclined. The visual anchor of the whole scape |
| Fukuishi — the secondary stone | Second largest, placed to balance the oyaishi — typically on the opposite side, at a lower visual weight |
| Soeishi — the accent stone | Smaller, and leaning toward the oyaishi. It reinforces the composition by directing attention |
| Suteishi — the sacrifice stones | Optional small stones added for naturalism, often partly buried in the substrate |
This is the structural grammar of Iwagumi, and it scales: the three-stone system and its extensions are why stone counts are traditionally odd — three, five or seven.
The Iwagumi Rock Arrangement
The classic Iwagumi setup uses three named stones:
Oyaishi (parent stone): The largest, dominant rock. Placed at a rule-of-thirds point, often slightly inclined. The visual anchor of the scape.
Fukuishi (secondary stone): Second-largest. Placed to balance the oyaishi — typically on the opposite side at a lower visual weight. Usually a different shape from oyaishi.
Soeishi (accent stone): Smaller, leaning toward the oyaishi. Reinforces the composition by directing attention.
Suteishi (sacrifice stones): Optional small stones added for naturalism. Often partly buried in substrate.
For more complex layouts (5 or 7 stones), the principle extends: one dominant rock, supporting rocks arranged asymmetrically, smaller accent stones, and possible sacrifice stones.
Practical Setup Process
When placing rocks in a new aquascape:
1. Plan dry first. Arrange rocks outside the tank, on a similar-sized surface, before adding water. Photograph different arrangements to compare.
2. Test composition from multiple angles. Most tanks are viewed primarily from one side, but visitors will see other angles. Make sure the scape works from the main viewing angle especially.
3. Build the substrate slope first. Add substrate to your tank, slope it appropriately, then place rocks. The slope supports the rocks and creates depth.
4. Use rock supports if needed. For dramatic angled placements that don't sit naturally, use small rocks underneath or substrate berms to maintain the angle.
5. Plan for plant growth. Leave gaps where plants will fill in. Don't place rocks so tightly that no plant can grow between them.
6. Test stability. Press on each rock — it should be solidly placed. Loose rocks can shift and damage the tank, fish, or composition.
7. Live with the layout for a few days before adding water. Take photos. Sleep on it. Adjust if needed. Once water and plants are in, changing the rock layout is much harder.
Anchoring Plants to Rocks
Some plants attach naturally to rocks rather than growing in substrate:
Anubias, Java fern, Bucephalandra, mosses — all attach to hardscape and grow on rocks.
Attachment methods:
- Tying with thread — cotton thread (which dissolves over weeks) or fishing line — wrap plant rhizome against rock
- Glue — cyanoacrylate (super glue) gel works underwater; small dab on rhizome, hold against rock for a few seconds
- Wedging — for moss specifically, can be wedged into rock crevices
Rock-attached plants give an aquascape a "lived-in" feel and add color and texture to hardscape elements.
Common Beginner Mistakes
Too many rocks. Restraint matters. A few well-placed rocks beat a tank full of them.
All same-sized rocks. Vary sizes dramatically — one big, several medium, a few small.
Symmetric placement. Centered or mirror-image arrangements feel artificial.
No clear focal stone. All rocks equally important = no hierarchy.
Rocks on flat substrate. Use substrate slope to support and embed rocks.
Wrong rock type for the water. Using calcium-rich rocks (seiryu, limestone) in soft-water shrimp or tetra tanks creates ongoing chemistry problems.
Random rock orientations. Stones tilted or rotated randomly look unintentional. Establish a "flow" direction for the scape.
Cleaning issues. Rocks placed too densely prevent siphoning, accumulate detritus, become algae traps.
The Bottom Line
Rocks are the architectural foundation of most aquascapes. Choosing the right type matters: seiryu stone for classic Nature Aquarium and Iwagumi (but raises pH); dragon stone (ohko) for textured drama and inert chemistry; lava rock for budget builds and biological filtration; mountain stone for naturalistic scapes; slate for stacked structures. Always test outside rocks with vinegar (fizz = calcium = pH effect) and inspect for safety before adding. Composition principles: odd numbers (3, 5, 7), one dominant stone placed at a rule-of-thirds point, asymmetric supporting rocks, deliberate angles suggesting natural flow, varied heights and sizes, planted bases to "ground" the rocks. The Iwagumi tradition (oyaishi, fukuishi, soeishi) provides a time-tested framework for three-stone arrangements that scales to more complex layouts. Plan dry, photograph variations, build substrate slope first, ensure stability, and live with the layout before committing to plants and water. Anchor plants like anubias, java fern, and moss to rocks for added visual interest. Restraint beats abundance — most great scapes use fewer rocks than beginners expect.
Related guides
- Hardscape: driftwood selection and placement
- Composition and design principles in aquascaping
- Aquascape styles: nature, iwagumi, Dutch, jungle
- Substrate choices for aquascapes
- Setting up your first aquascape, step by step
- Understanding pH, KH and GH
- How to plant and anchor aquarium plants
- Aquascaping for beginners
Got questions about your specific setup? Drop them in our Community Forum — we love helping new fishkeepers get started right.