You've read about composition, picked a style, gathered hardscape and substrate. Now comes the hard part — turning all that into a finished aquascape. The execution matters as much as the planning, and a few crucial steps in the right order make the difference between a smooth setup and frustration. Here's the complete step-by-step process for your first aquascape, from empty tank to planted scene.
At a glance: the ten steps
| Step | What happens |
|---|---|
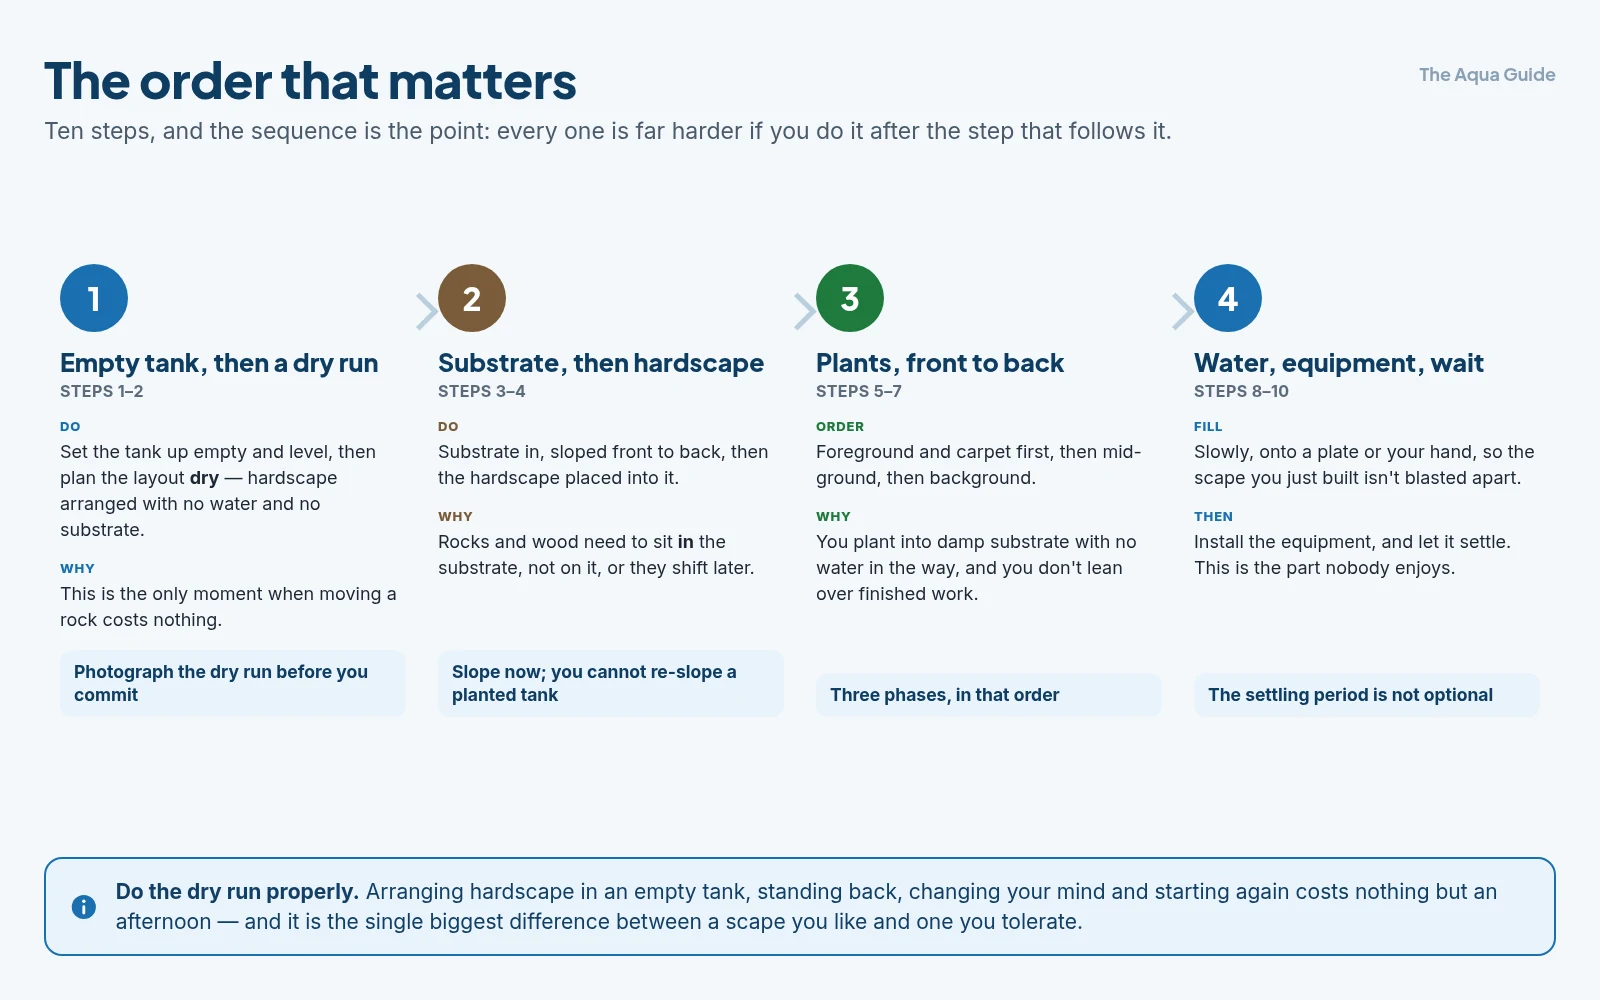
| 1–2 | Set up the empty tank, then plan the layout as a dry run — hardscape only, no water |
| 3–4 | Add substrate, sloped, then place the hardscape into it |
| 5–7 | Plant in three phases: foreground and carpet, then mid-ground, then background |
| 8 | Fill with water, slowly and gently, onto a plate or your hand |
| 9 | Install the equipment |
| 10 | The settling period — which is where the patience comes in |
The sequence is the point. Every step is far harder if you attempt it after the one that follows — planting through water, sloping substrate around finished hardscape, filling before anything is anchored.
Before You Start: The Pre-Setup Checklist
Don't begin setup until you have:
The tank cleaned and ready — rinsed thoroughly with water only (no soap), placed in its permanent location on a level stand, with the lid and lighting ready to install.
Equipment ready — filter, heater, lighting, timer for lights, thermometer. Test each piece before installation.
All substrate purchased — calculated for your tank size with extra for slope and any underlayers.
Hardscape selected and prepared — rocks tested for safety, driftwood soaked and ready to sink, all pieces inspected and cleaned.
Plants on order or in hand — purchased or arriving, with a plan for keeping them alive until planting.
Water source decided — tap water with dechlorinator, RO water, or other source ready.
Time available — initial setup takes 4–8 hours minimum. Don't start at 9pm hoping to finish quickly.
A general design plan — even a rough sketch of where major elements will go. The plan can change, but having a starting concept prevents paralysis.
If anything on this list is missing, finish that first. Trying to source materials mid-setup creates frustration and shortcuts.
Step 1: Set Up the Empty Tank
Time: 30–60 minutes.
Position the tank in its permanent location. Once water is in, moving is nearly impossible. Verify:
- Level surface (use a level — even slight tilt looks worse when planted)
- Sturdy stand rated for water weight
- Access to electrical outlets
- Reasonable distance from windows (avoid direct sunlight)
- Clearance for maintenance access
Test the tank by adding a few inches of water and watching for leaks for an hour. Better to find leaks now than after substrate and plants are in.
Install background if you're using one — a sheet of black or natural-color background attached to the back glass. Easier to do now than after the tank is full.
Dry-fit equipment — verify the filter, heater, and lighting all fit properly. Don't fully install yet; just confirm placement works.
Step 2: Layout Planning (Dry Run)
Time: 1–2 hours, possibly across multiple sessions.
This is the most important step and the one most beginners rush.
Outside the tank, on a flat surface similar in size, arrange your hardscape and substrate concept:
1. Mark out the tank footprint with tape or paper on a table.
2. Add substrate-equivalent material — even rough piles to suggest the slope you'll create.
3. Place hardscape pieces in your planned positions. Move them, photograph from the intended viewing angle, then move them again. Try different arrangements.
4. Apply composition principles:
- Rule of thirds — main hardscape at upper or lower third intersections
- One dominant focal point
- Triangular layout (highest point at one third)
- Asymmetric balance
- Negative space preserved
5. View from the intended viewing distance — usually 3-6 feet away. Different from how it looks when you're hunched over.
6. Photograph variations. Pictures often reveal compositional issues invisible in person. Compare images side by side.
7. Sleep on it. Aim to leave the layout overnight before committing. Fresh eyes often see what tired eyes don't.
8. Plan plant placement. Sketch where each plant goes. Carpet plants? Background tall plants? Mid-ground feature plants? Stem plant groupings? This planning prevents random plant placement during setup.
When the layout feels right, photograph it from multiple angles. You'll reference these photos during in-tank setup.
Step 3: Adding Substrate
Time: 30–60 minutes.
For active aquasoil:
- Pour the substrate directly into the dry tank
- Shape it according to your planned slope (front low, back high; or whatever your design calls for)
- Use a flat tool (spatula, ruler) to smooth and shape
- Build the dramatic slope you planned — going heavier than seems necessary, since substrate compacts
For inert substrates:
- Rinse thoroughly first if needed (some sands have dust; aquasoil doesn't need rinsing)
- Add to dry tank
- Shape as above
Substrate slope tips:
- Add about 1.5x the substrate you think you need for the back; it will compact and slip forward
- Use rocks (placed temporarily or permanently) to support steep slopes
- Don't make the front too thick — you want depth contrast
- Smooth the surface for visual cleanliness
For layered substrates (root tabs under inert substrate, or aquasoil under sand cap):
- Add the bottom layer first
- Spread root tabs if using (across the area, not in a pile)
- Add the top layer on top
- Mix gently at borders
Step 4: Placing Hardscape
Time: 1–2 hours.
This is where your planning pays off.
Reference your dry-run photos. Replicate the layout in the actual tank.
Start with the dominant piece (the largest rock or piece of driftwood). Place it first, at its planned rule-of-thirds position. This anchors everything else.
Add supporting pieces. Smaller stones and additional wood, balancing the composition.
Embed hardscape in substrate. Don't just place rocks/wood on top — push them partially into the substrate so they look "planted." Build substrate up around them.
Test stability. Each piece should be solid. Wobbly pieces will shift over time and ruin the scape.
Check angles and lines. Driftwood branches should point intentionally — usually upward and inward toward the focal point. Stone tilts should suggest natural flow.
Step back frequently. Walk away to the intended viewing distance, then look at the layout. Issues invisible up close become obvious at distance.
Adjust iteratively. Don't be afraid to remove and re-place pieces. The cost of an iteration now is small; the cost of changing later is enormous.
When satisfied, photograph the layout from the viewing angle. This is what your finished aquascape will look like before plants — a major milestone.
Step 5: Adding Plants (Phase 1 — Foreground and Carpet)
Time: 1–2 hours.
Plants go in dry tank (substrate moist but no water yet) for easier placement.
Mist the substrate lightly with a spray bottle if it's dry. Slightly damp is ideal for planting.
Plant carpet plants first. Foreground species (hairgrass, monte carlo, glossostigma, dwarf baby tears):
- Divide tissue-culture or potted plants into small clumps (small clumps, planted close together, fill in faster than large clumps spaced apart)
- Using long tweezers, plant each small clump deep into the substrate
- Space clumps about 1–2 cm apart for fast carpeting
- Plant in rows or grid patterns for even coverage
For larger foreground plants (Sagittaria, larger crypts):
- Plant individually with enough space for growth
- Bury just the roots, leaving the crown above substrate
- Group same-species plants for visual coherence
Step 6: Adding Plants (Phase 2 — Mid-Ground)
Time: 30–60 minutes.
Mid-ground plants (Cryptocoryne, smaller Echinodorus, anubias, java fern, smaller stem plants):
- Plant rosette plants (Crypts, Echinodorus) deep enough that the crown sits at substrate level — not too deep, not too shallow
- Anchor anubias and java fern to rocks or wood (NOT in the substrate — their rhizomes rot if buried)
- Plant stem plants in groups of 5+ for visual impact (single stems look sparse and weak)
- Vary heights within mid-ground for natural feel
Step 7: Adding Plants (Phase 3 — Background)
Time: 30–60 minutes.
Background plants (tall stems, large Echinodorus, vallisneria):
- Plant tall species at the back, with shortest in front of them
- Stem plants in large groups for fullness
- Bury stems individually, several centimeters deep
- Position vallisneria and tall plants so they don't block hardscape view from the front
Special considerations:
- Moss balls and floating moss go in last (after water is added)
- Floating plants are added after water fill
Step 8: Filling with Water
Time: 30–60 minutes.
Slow filling is crucial — fast water flow will displace plants and substrate.
Method 1: Plastic wrap. Lay plastic wrap or a plate over the substrate. Pour water onto the plastic — it spreads gently. Once water covers everything, carefully remove the wrap.
Method 2: Hand-held cup. Pour water from a cup against the side of the tank, letting it cascade down without much force.
Method 3: Tube siphon from a higher source. Set up a slow drip or siphon from a bucket on a higher level.
During filling:
- Add dechlorinator to the water (or pre-dechlorinate in buckets first)
- Match water temperature to your target tank temperature
- Watch for plants floating up — re-plant immediately
- Check substrate hasn't shifted dramatically
Don't completely fill if you're using a hang-on-back filter — leave appropriate gap.
Step 9: Installing Equipment
Time: 30 minutes.
Once water is in:
- Install the filter (prime it if necessary; HOB filters need water in the intake)
- Install the heater (don't plug in yet — wait for water to fully cover it)
- Install lighting (mount on tank, plug into timer)
- Verify all equipment is positioned correctly
Don't power on yet for everything immediately — let the tank settle for 30 minutes first. Then:
- Plug in filter (verify flow direction is correct)
- Plug in heater (set to target temperature)
- Plug in lighting (only briefly — extended lighting before tank stabilizes encourages algae)
Initial lighting schedule for first week: only 4–6 hours per day, lower intensity if possible. Algae loves new tanks; reduce its head start.
Step 10: The Settling Period
Time: 1–2 hours of initial cleanup, then days of patience.
Initial cleanup (within first 24 hours):
- Check for floating debris from substrate; remove
- Check for plant fragments that drifted; replant or remove
- Top off water level if substrate absorbed significant amount
- Verify all equipment running correctly
The 1–4 week settling phase:
- Test water parameters daily during first 2 weeks
- Expect cloudy water initially — bacterial bloom is normal
- No fish for weeks — let the tank cycle first (Part 2)
- Daily 20–30% water changes in weeks 1–4
- Watch for ammonia spikes if using aquasoil (substrate releases ammonia)
- Resist re-arranging. Let the scape settle. It will look messy initially.
At 2–4 weeks:
- Water clears
- Some plants beginning to grow
- Substrate has stabilized
- Cycle progressing or complete
At 4–8 weeks:
- Plants establishing root systems and growing visibly
- Carpet plants spreading
- Tank gaining its first "scape" appearance
- Time to add fish (after testing parameters and ensuring cycle completion)
Months 2–6:
- Plants filling in significantly
- The scape becoming "alive"
- First major pruning round
- The aquascape starts looking like what you envisioned
What to Expect at Each Stage
A realistic timeline:
Day 1: Tank looks decent at setup, but plants look sparse and disorganized. The scape hasn't "started" yet.
Week 1: Cloudy, ugly, possibly with some plants struggling. This is normal.
Week 2–4: Water clears, plants begin to root, the tank stabilizes but doesn't yet look mature.
Month 2: Plants visibly growing, carpets starting to spread, scape gaining coherence.
Month 3–4: First proper maintenance pruning, scape recognizably matching your design vision.
Month 6: Tank approaching maturity, plants filling in fully, scape achieves the look you envisioned at setup.
Year 1+: Mature aquascape, with character and presence that only time produces.
Tell yourself this in advance: your tank will look bad before it looks good. The growth takes weeks to months. Patience is the most important tool in aquascaping.
Common Setup Mistakes
Rushing the layout phase. Set up looks unprofessional when hardscape is placed hastily. Take the time.
Adding fish too early. Cycle the tank first. Adding fish during cycling kills them.
Over-lighting initially. Strong light + new tank = algae explosion. Reduce lighting for first 2-4 weeks.
Planting too sparsely. New tanks need dense planting from day one to outcompete algae. Don't plant minimally and "let it grow in."
Burying plant crowns. Crypts, Echinodorus, and other rosette plants rot if buried too deep. Their crown should sit at substrate level.
Burying anubias/java fern rhizomes. They rot. Attach to hardscape only.
Not enough plants. Visit a fish store with a list; buy more than you think you need.
Filling too fast. Plants float out, substrate disturbs, everything shifts.
Not testing water. During the first weeks, daily testing catches problems before they escalate.
Over-impatient redesigning. Wait at least 2–3 months before deciding the scape "doesn't work." It hasn't grown in yet.
The Bottom Line
Setting up an aquascape is a 10-step process: prepare the empty tank in its permanent location; plan the layout extensively outside the tank with photos and time to consider; add substrate with deliberate slope; place hardscape starting with the dominant piece at a rule-of-thirds position; plant foreground/carpet plants first while substrate is dry; add mid-ground plants; add background plants; fill water slowly using plastic wrap or gentle pouring; install equipment and start with reduced lighting; allow weeks of settling time with daily water changes during cycling. The most important step is the planning — the layout you commit to is what you'll live with. Photograph variations, sleep on decisions, and don't be afraid to iterate. Expect the scape to look bad for the first 1–2 months and only begin matching your vision around month 3–6. Patience is the central virtue of aquascaping. Your first scape will be imperfect — that's both expected and part of the journey. Each subsequent setup builds on what you learned in the previous one, and over time you develop the eye and skills to produce truly beautiful work.
Related guides
- Aquascaping for beginners
- Composition and design principles in aquascaping
- Substrate choices for aquascapes
- Hardscape: choosing and placing rocks
- Hardscape: driftwood selection and placement
- How to plant and anchor aquarium plants
- Aquascape maintenance and evolution over time
- First aquarium setup: a day-by-day beginner's guide
Got questions about your specific setup? Drop them in our Community Forum — we love helping new fishkeepers get started right.