For most fish species, live foods make the difference between a few surviving fry and a full successful brood. Tiny baby fish need food sized to their mouths, with the right nutrition, in quantities they can hunt continuously. Commercial powdered foods help, but cultured live foods are the breeder's secret weapon. Here's the complete guide to the most useful live and cultured foods, how to grow them, and which to use for which fry.
At a glance: the cultures worth keeping
| Culture | What it's for |
|---|---|
| Baby brine shrimp (BBS) | The gold standard. Most fry take it eagerly and grow fast on it |
| Microworms | For fry too small for BBS, and an easy first culture to keep |
| Vinegar eels | For the very smallest fry, and they stay alive in the water for days |
| Daphnia | For older fry and juveniles, and good roughage |
| Infusoria | The first food for the tiniest egg-layer fry |
| Greenwater | A backup for microscopic fry, and what infusoria themselves feed on |
Frozen alternatives exist for all of these, and they are a reasonable fallback — but live food moves, and movement is what triggers a fry to strike.
Why Live Food Matters for Fry
Several reasons live foods are superior to dry foods for fry:
Sizing matches the fry's mouth perfectly. A baby brine shrimp is exactly the right size for a tetra fry's tiny mouth. Powdered foods often don't match — too big, too small, or wrong shape.
The food moves and triggers hunting instinct. Fry are programmed to hunt moving prey. A live food activates feeding behavior that dry food sometimes doesn't.
Higher protein, better nutrition. Live foods generally have higher protein and digestibility for growing fry than dried alternatives.
Doesn't foul water as quickly. Live foods stay alive and edible in the tank for hours. Dry powdered food settles, decays, and pollutes within minutes if uneaten.
Triggers faster growth. Direct comparison: fry fed live food grow noticeably faster than fry fed only dry food. Many species won't grow optimally on dry food alone.
For the most demanding species (very small fry of egg-laying species), live food isn't optional — it's required for survival.
Baby Brine Shrimp (BBS) — The Gold Standard
The single most useful live food. If you only set up one culture, this is it.
What they are: Freshly-hatched larvae of brine shrimp (Artemia). Bright orange-pink, about 0.4mm long when first hatched — perfect size for most fry.
Nutrition: Excellent — high protein, complete amino acid profile, rich in essential fatty acids when hatched.
Suitable for: Almost any fry from 3mm+ — livebearer fry, most tetras, corydoras, danios, gouramis, many others.
Setup:
Equipment:
- A 1-liter or 2-liter bottle (cleaned soda bottle, inverted with bottom cut off, works perfectly)
- Air pump and airline tubing (no airstone needed — just bare tubing)
- Brine shrimp eggs (cysts) — sold at most aquarium stores or online
- Aquarium salt or marine salt — NOT iodized table salt
- A small light if your room is cool (BBS hatch best around 75–80°F)
Process:
- Mix the brine — about 1 tablespoon salt per liter of water
- Add cysts — about 1/4 teaspoon for a hatching cycle (more or less based on need)
- Aerate vigorously — bubbles should keep cysts and water in constant motion
- Maintain temperature at 75–80°F
- Wait 24–36 hours — BBS will hatch and become visible as an orange cloud
- Harvest by turning off the air for a minute (BBS settle to bottom, eggs/shells float), then siphon the BBS into a fine mesh net
- Rinse briefly in freshwater before feeding to fry
Tips:
- Run two cultures in alternating cycles for continuous BBS supply
- Newly-hatched BBS are most nutritious — feed within 24 hours of hatching for best fry growth
- Store extra harvested BBS in fridge briefly if needed
- Use fish-grade brine shrimp eggs; quality varies — better eggs = higher hatch rate
A small bottle hatchery produces enough BBS for a small fry tank for free, indefinitely. Worth every aquarium breeder's time to set up.
Microworms
Easy, prolific, smaller than BBS. Useful for the smallest fry and as a supplement to BBS.
What they are: Tiny nematode worms (about 1mm long, very thin) that culture easily on simple media.
Suitable for: Very small fry, livebearer fry, alternative to BBS for variety.
Setup:
Equipment:
- A small plastic container with lid (margarine tub or similar)
- Oats, oat flour, or instant mashed potato as culture medium
- A starter culture of microworms (from aquarium friends, clubs, or online)
Process:
- Prepare media — mix oat flour or mashed potato flakes with water to make a thick paste
- Spread in a thin layer on the bottom of the container (1/2 inch thick)
- Add starter culture — a teaspoonful of existing culture spread over the surface
- Sprinkle with a pinch of dry yeast
- Cover with the lid (leave a small ventilation gap)
- Wait 5–7 days — worms multiply and crawl up the sides of the container
- Harvest by wiping worms off the container sides with a finger or cotton swab
Maintenance:
- A culture lasts 3–4 weeks before going bad (smell becomes unpleasant)
- Keep multiple cultures running in alternating timing
- Restart from existing cultures regularly
Tips:
- Smells slightly fermented when healthy; smells strongly bad when going bad
- Some keepers find them aesthetically unpleasant to handle; others find the culture easy and routine
Vinegar Eels
For the tiniest fry. When microworms and BBS are too big, vinegar eels are the answer.
What they are: Microscopic nematodes (about 0.05mm thick, 1–2mm long), cultured in vinegar with apple slices.
Suitable for: Extremely small fry — first-feeding fry of small egg-layers (small tetras, killifish, dwarf cichlids).
Setup:
Equipment:
- A glass jar or bottle with lid (1-liter works well)
- Apple cider vinegar (50% diluted with water)
- A few slices of apple
- Starter culture
Process:
- Fill jar with 50/50 mix of apple cider vinegar and water
- Add a few apple slices
- Add starter vinegar eels
- Cover loosely (allow air, prevent fruit flies)
- Let sit at room temperature for 4–6 weeks
- Vinegar eels develop slowly but cultures last for months
Harvest:
- Use a fine mesh or a specialized vinegar eel harvest funnel
- Pour culture through media, rinse eels briefly, transfer to fry tank
Notes:
- Slow to establish (weeks before harvest) — start early before you need them
- A well-established culture lasts months with occasional addition of apple slices
- Vinegar eels can live in tank water for hours, giving fry plenty of hunting time
Daphnia
Larger live food for growing fry. Once fry are past the tiniest stage, daphnia provide bigger, juicier food.
What they are: Small freshwater crustaceans (about 1–3mm) that swim in jerky movements. Triggers strong feeding response.
Suitable for: Larger fry (1–2 weeks past first-feeding for many species), juvenile fish, and as a great variety food for adults.
Setup:
Equipment:
- A bucket or large container (5–10 gallons)
- Outdoor or strong indoor light
- Greenwater culture or pre-made daphnia food
- Starter culture
Process:
- Fill container with dechlorinated water (or aged tap water)
- Add greenwater or daphnia food (commercial products available)
- Add starter daphnia
- Place where they get good lighting (outdoors in mild weather works best)
- Within 1–2 weeks, daphnia population grows visibly
- Harvest with a fine mesh net
Tips:
- Cultures crash from temperature swings, water quality issues — keep stable
- Multiple cultures running in parallel provide insurance
- Outdoor cultures are easier (more sun = more algae food); indoor cultures need supplementation
Infusoria
Ultra-tiny food for ultra-tiny fry. When all other foods are too big.
What they are: Microscopic organisms (paramecium, rotifers, ciliates) cultured in water with decaying organic matter.
Suitable for: First-feeding fry of the smallest species — some killifish, very small tetras, ottos.
Setup:
Equipment:
- A jar of tank water or pond water (rich in microbes)
- Decaying organic material — lettuce leaves, hay, blanched spinach, or banana peel
Process:
- Fill jar with tank water in a sunny location
- Add a piece of organic material (lettuce, hay)
- Wait 5–10 days — water becomes cloudy with microorganisms
- Drop small amounts directly into fry tanks
Tips:
- Smells musty; sit outdoors or in a basement
- Multiple jars in rotation provide continuous supply
- Combine with greenwater for richer cultures
Greenwater (Phytoplankton)
Live single-celled algae for fry. Both as food directly and to feed other foods.
What it is: Cultured single-celled algae in nutrient-rich water; appears as cloudy green.
Suitable for: Phytoplankton-eating fry (very young filter feeders), as food for daphnia and rotifer cultures.
Setup:
- Fill clear container with dechlorinated water + a tiny amount of liquid fertilizer
- Add starter (water from a tank with algae problem works)
- Place in strong light
- Within 1–2 weeks, water turns vivid green
- Use as base for daphnia/rotifer cultures, or add small amounts to fry tanks
Walter Worms & Banana Worms
Variants of microworms with different size/nutrition. Walter worms are slightly larger; banana worms slightly smaller.
Setup: Similar to microworms. Useful for variety in fry diet.
Frozen Alternatives
When live cultures aren't feasible, frozen versions cover most of the same ground:
Frozen baby brine shrimp — pre-hatched and frozen. Convenient, but not quite as nutritious as freshly hatched.
Frozen cyclops — tiny crustaceans, good for small fry.
Frozen daphnia — for larger fry.
Frozen bloodworms (cut up small) — for older fry transitioning to adult food.
Frozen foods are excellent backup; many breeders use both live and frozen for variety.
Choosing Foods by Fry Size
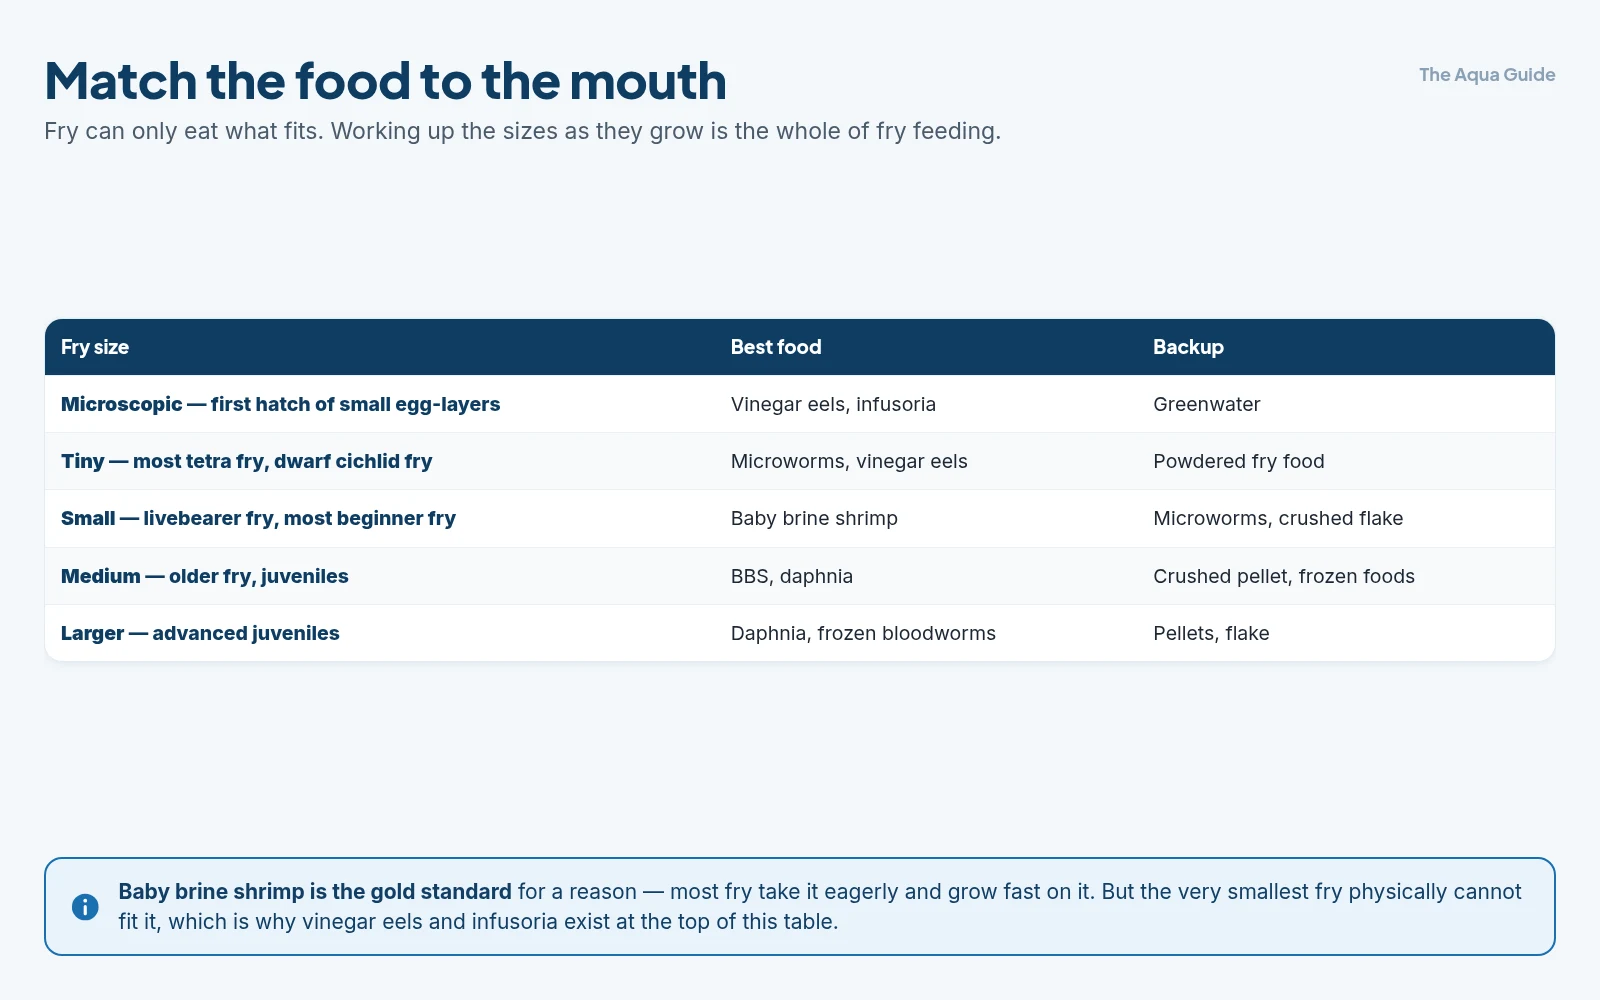
A quick reference:
| Fry Size / Type | Best Food | Backup |
|---|---|---|
| Microscopic (first hatch of small egg-layers) | Vinegar eels, infusoria | Greenwater |
| Tiny (most tetra fry, dwarf cichlid fry) | Microworms, vinegar eels | Powdered fry food |
| Small (livebearer fry, most beginner fry) | Baby brine shrimp | Microworms, crushed flake |
| Medium (older fry, juveniles) | BBS, daphnia | Crushed pellet, frozen foods |
| Larger (advanced juveniles) | Daphnia, frozen bloodworms | Pellets, flake |
Most beginner breeding can be successful with just baby brine shrimp + microworms as the two essentials. Add vinegar eels only if working with very small species.
Feeding Schedule
For fry tanks:
4–6 small feedings per day — much more frequent than adult fish
Rotate food types — variety improves growth and survival
Watch for uneaten food — siphon out promptly in small tanks
Don't overfeed — small frequent meals beat large infrequent ones
The Culture Setup as a System
Serious breeders run multiple cultures in continuous rotation:
- 2 brine shrimp hatcheries (started 12 hours apart for continuous supply)
- 2–3 microworm cultures (1 fresh, 1 active, 1 declining — start a new one every 2 weeks)
- 1 vinegar eel culture (slow but long-lasting)
- 1 daphnia culture (when raising larger fry)
This sounds like a lot but each takes only a few minutes weekly. Once set up, it runs itself.
Common Mistakes
Starting cultures too late. Some cultures take weeks to become productive. Set them up before you need them, not when fry are already hungry.
Single culture risk. A culture can crash overnight. Always have backups running.
Feeding too little. Fry need constant food. Many small feedings.
Feeding too much in one shot. Uneaten food fouls water fast.
Wrong food for size. Tiny fry can starve next to bigger food they can't eat.
Skipping live food entirely. Many fry species simply don't thrive on dry food alone. Plan for live.
The Bottom Line
Live and cultured foods are the breeder's essential toolkit for raising fry successfully. Baby brine shrimp is the single most useful food — set up a soda-bottle hatchery and run continuous 24-hour cycles. Microworms are easy to culture and useful for smaller fry. Vinegar eels handle the tiniest fry of demanding species. Daphnia for larger fry; infusoria and greenwater for the most demanding first-feeders. Match the food to the fry's mouth size, feed 4–6 small meals daily, rotate food types for variety, and always have backup cultures running. Frozen alternatives cover gaps when live cultures aren't available. Setting up the culture system takes a few hours initially and a few minutes weekly to maintain — but the payoff is dramatically higher fry survival and faster growth. Most beginner breeding succeeds with just BBS + microworms; add other foods as you scale into more demanding species. Once your culture system is running, raising fry transforms from a stressful challenge to a steady routine.
Related guides
- Raising fry: the first weeks
- Setting up a breeding tank
- The easiest fish to breed: livebearers
- Breeding egg-layers: corydoras, tetras and beyond
- Choosing the right food: flakes, pellets, frozen, live
- How often and how much to feed your fish
- The beginner's guide to breeding invertebrates
- Freshwater shrimp: cherry, amano and more
Got questions about your specific setup? Drop them in our Community Forum — we love helping new fishkeepers get started right.