Getting fish to spawn is only the beginning. The real challenge is raising the fry — keeping tiny, fragile, demanding little fish alive and growing until they're robust enough to join adult tanks. The first few weeks are the most critical; survival rates depend almost entirely on how well you handle this period. Here's the playbook for raising fry of common beginner species through their early weeks.
The First 24 Hours
Newly-emerged fry — whether just-hatched from eggs or just-born from livebearer mothers — need very specific conditions in their first day:
Livebearer fry (guppies, platies, mollies, swordtails) emerge ready to swim and eat. They have a small yolk reserve but will start hunting almost immediately. Their first 24 hours need:
- Clean, stable water at the same parameters as the parent tank
- Hiding cover from anything that might eat them
- Initial food offered within hours of birth (very fine, almost powdered)
Egg-layer fry (tetras, corys, danios) hatch with a larger yolk sac. They typically:
- Stay attached to surfaces or sink to the bottom for the first 1–3 days
- Don't eat anything during this yolk-sac period — feeding too early actually fouls the water
- Become "free-swimming" when the yolk is absorbed — that's when first feeding begins
Critical rule: Don't feed egg-layer fry while they still have visible yolk sacs. Start feeding the day they become free-swimming and start hunting.
First Foods by Fry Size
The right first food depends on the size of the fry's mouth:
Very Tiny Fry (under 3mm — most tetras, dwarf cichlids, killifish)
These fry need microscopic food:
- Infusoria — a culture of microorganisms (paramecium and others) grown in water with green leaves or banana peels. Tiny enough for the smallest fry.
- Vinegar eels — microscopic nematodes cultured in vinegar with apple slice. Excellent for very tiny fry.
- Greenwater (phytoplankton) — single-celled algae that feed rotifers and provide grazing for fry directly.
- Powdered fry foods with extremely fine particles (sift through a fine mesh to get the smallest particles).
For these species, having a microscopic food culture going BEFORE spawning is essential. The fry won't survive on anything bigger.
Small Fry (3–5mm — most common community species, livebearer fry)
These fry can eat:
- Baby brine shrimp (BBS) — freshly hatched Artemia, the gold standard for fry food. Excellent nutrition, perfect size, fry love them.
- Microworms — small nematodes cultured easily at home. Great for tiny fry.
- Powdered fry foods of appropriate small particle size.
- Crushed flake food ground very fine.
Larger Fry (5mm+ — older livebearer fry, larger species)
These can move up to:
- Larger live foods — small daphnia, walter worms, vinegar eels (still useful)
- Crushed flake in slightly larger particles
- Small frozen foods — finely-chopped frozen bloodworms, frozen baby brine shrimp
- Pellet crumbs from regular pellet food
The progression of food types matches fry growth. Start with the smallest food the fry can eat, and graduate to larger food as they grow.
Feeding Frequency
Fry have very different feeding needs than adults:
Newborn–2 weeks: 4–6 small feedings per day. Tiny amounts each time. They digest fast and need constant fuel for growth. A common mistake is treating fry like adults (1–2 meals); they'll grow slowly or starve.
2–4 weeks: 3–4 feedings per day.
4–8 weeks: 2–3 feedings per day, transitioning toward adult schedule.
8+ weeks: 1–2 feedings per day, normal schedule.
Each feeding is tiny — what the fry can eat in 1–2 minutes. Overfeeding fouls the water rapidly in small fry tanks; underfeeding stunts growth.
At a glance: keeping fry water right
| Do | Why |
|---|---|
| Daily water changes of 20–25% | Fry tanks foul fast, and clean water dramatically improves growth rates. Yes, daily |
| Match the temperature and parameters | Fry tolerate a dramatic shift even less well than adults do |
| Siphon the bottom | Uneaten food and waste. A turkey baster or a thin siphon tube works well in a bare-bottom tank |
| Sponge filter, gentle airflow | Filtration matters — and the biofilm the sponge develops is something fry graze on |
| No big disturbances | Avoid catching, moving or stressing them unnecessarily during this period |
The two jobs are food and water, repeatedly. Neither is complicated; both are relentless for the first few weeks.
Water Quality for Fry
Fry are more sensitive to water quality than adults. They produce more waste relative to their size and react quickly to ammonia or nitrite.
Daily water changes of 20–25% are standard during the first few weeks. Yes, daily. Fry tanks foul fast, and clean water dramatically improves growth rates.
Use water matched to the tank — same temperature, same parameters. Avoid dramatic shifts.
Siphon the bottom to remove uneaten food and waste. A small turkey baster or thin siphon tube works well in bare-bottom tanks.
Sponge filter on gentle airflow. Filtration matters; the sponge develops biofilm that fry can graze on.
No big disturbances. Avoid catching, moving, or stressing fry unnecessarily during this period.
Growth Through the First Weeks
A rough timeline:
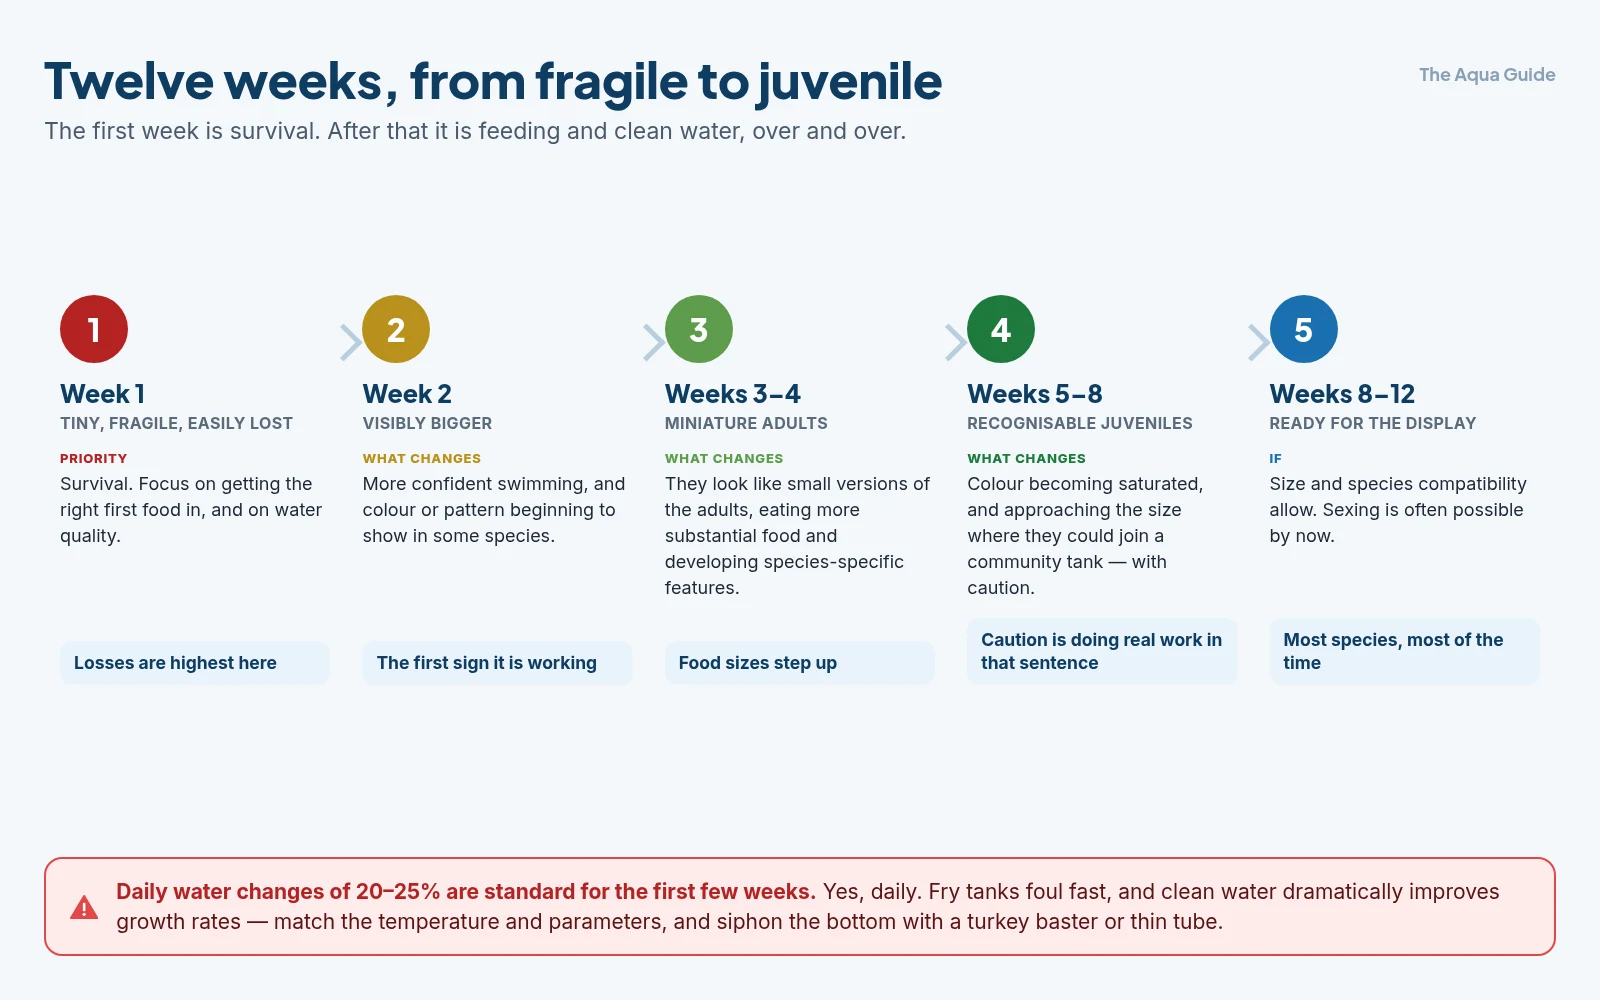
Week 1: Tiny, fragile, easily lost. Survival is highest priority. Focus on first food, water quality.
Week 2: Visibly bigger, more confidently swimming, color or pattern beginning to show in some species.
Weeks 3–4: Fry look like miniature versions of adults. Eating more substantial food. Beginning to develop species-specific features.
Weeks 5–8: Recognizable juveniles. Color becoming saturated. Approaching size where they could join community tanks (with caution).
Week 8–12: Most species ready for display tanks (if size and species compatibility allow). Sexual identification often possible.
Growth rate varies enormously by species. Guppies are visible in days; angelfish take weeks to look like recognizable fish; some catfish species develop slowly over months.
When to Move Fry to the Display Tank
Wait until fry are:
- Too big to be eaten by any tankmate — typically when they're more than half the mouth-width of any potential predator. A 1-inch fish has a 1/4-inch mouth, so fry need to be at least 1/2 inch.
- Eating regular community-tank food — flakes, small pellets, normal food.
- Robust enough to handle the activity of a busy community tank.
For livebearer fry in typical small community tanks: 6–8 weeks.
For egg-layer fry: usually longer, 10–16 weeks depending on growth rate.
When moving:
- Acclimate carefully (drip method ideal) — fry tank water may differ from display
- Move during low-activity time (evening, after feeding)
- Release in a heavily-planted area where they can hide initially
- Watch for the first few days to ensure they're feeding and not being chased
Common Problems
Fry Disappearing
If fry numbers drop steadily, possible causes:
- Cannibalism — older fry eat smaller siblings. Some species are notorious for this; separate by size if possible.
- Predation — adult fish, even other fry parents, will eat baby fish.
- Filter intake — if a power filter is somehow present, the impeller can chop fry. Sponge filter only.
- Stuck in décor — fry can wedge themselves in tight spaces.
Fry Not Growing
If fry seem to stall in size:
- Food too sparse or wrong type — increase frequency, vary food, ensure right size for mouths
- Water quality declining — increase water changes
- Temperature too low — many tropical fry grow faster at the upper end of comfort range
- Overcrowding — too many fry in a small tank stunts growth
Deformities Appearing
Some causes:
- Genetic issues from line-breeding or inbreeding
- Nutritional deficiencies in parents (poor conditioning) or fry (poor first food)
- Water quality issues during development
Cull deformed fry humanely; don't breed from them.
Population Explosion
A real risk with prolific species:
- Plan ahead what you'll do with the eventual adults
- Network locally — fellow keepers, fish stores, clubs often take homebred fish
- Don't save every fry — natural attrition is fine; you don't have to maximize survival every time
- Have a quitting point — if a brood is too many, stop trying to save more
Setting Up a Brine Shrimp Hatchery
Baby brine shrimp (BBS) are the most useful single fry food. Here's a simple hatchery:
Equipment:
- A 1- or 2-liter bottle (a clean soda bottle works) with bottom cut off
- Air pump and airline tubing
- Salt (specifically marine salt or aquarium salt, not table salt)
- Brine shrimp eggs (cysts) from a pet store or online
Process:
- Fill the inverted bottle with 1 liter of water
- Add about 1 tablespoon of salt; dissolve
- Add a quarter-teaspoon of brine shrimp eggs
- Insert airline tubing to the bottom and aerate vigorously
- Maintain at 75–80°F (room temperature usually works)
- 24–36 hours later, baby brine shrimp hatch
Harvest:
- Turn off the air; brine shrimp settle to one side, empty egg shells float
- Siphon the orange concentration of BBS (avoiding shells) into a fine mesh net
- Rinse briefly in freshwater
- Feed to fry
A hatchery cycle produces enough BBS for several feedings. Many breeders run two hatcheries in alternating cycles for continuous supply.
Live Plant Help
Live plants in fry tanks provide:
- Hiding cover — critical for fry survival
- Surface area for microorganisms — fry graze on the biofilm
- Oxygen production during the day
- Some nutrient uptake that helps water quality
Best plants for fry tanks:
- Java moss — perfect hiding cover, easy to keep
- Hornwort — fast-growing nutrient sponge
- Floating plants — surface cover and habitat
- Java fern — hardy, attaches to décor
Avoid plants that require strong lighting or CO₂ injection — fry tanks have modest lighting.
The Bottom Line
Raising fry through the first weeks demands attention to four things: appropriate first foods (sized to the fry's mouth — infusoria/vinegar eels for very tiny fry, baby brine shrimp and microworms for most beginner fry, larger foods as they grow), frequent feeding (4–6 small meals daily early on), clean water (daily small water changes), and patience (fry develop over weeks not days). The first 24 hours need clean stable conditions and species-appropriate first food timing — livebearer fry eat immediately; egg-layer fry wait until yolk sacs absorb. A simple brine shrimp hatchery in a soda bottle is the single most useful tool. Move fry to the display tank only when they're too big to be eaten and eating community-tank food, usually 6–16 weeks depending on species. Survival rates of 50%+ from spawn to robust juvenile are realistic; 90%+ is excellent. The key is consistency: stable conditions, frequent appropriate feeding, clean water, and resisting the urge to overcrowd or under-feed. The first weeks are the most demanding but also the most rewarding part of breeding — watching tiny dots become recognizable fish is genuinely magical.
Related guides
- Live and cultured foods for fry
- Setting up a breeding tank
- The easiest fish to breed: livebearers
- Breeding egg-layers: corydoras, tetras and beyond
- How often and how much to feed your fish
- The correct step-by-step water change
- How many fish can my tank hold?
- The beginner's guide to breeding invertebrates
Got questions about your specific setup? Drop them in our Community Forum — we love helping new fishkeepers get started right.