You've built a beautiful tank. Now you want to share it — or document its evolution, or enter a competition. But the photos never quite capture what your eyes see in person. There's glare on the glass, blurry fish, dull colors, weird reflections. Aquarium photography is its own skill, distinct from regular photography. The principles are different, the techniques specialized, and good results require some learning. Here's the complete guide.
At a glance: why it's hard
| The problem | What it does to the photo |
|---|---|
| Shooting through glass and water | Reflections, refraction and a loss of contrast that no setting fixes |
| The subject moves | Fish do not hold still, and the shutter speed that freezes them costs you light |
| Aquarium lighting is strongly coloured | Colour casts that look wrong on a screen even when they looked right in the room |
| Low light overall | Pushes you toward wide apertures, high ISO, or both — each with its own cost |
Almost all of it comes down to the light you can get in and the shutter speed you can afford — which is why the settings table matters more here than the camera does.
Why Aquarium Photos Are Hard
A few things conspire against you:
Glass between camera and subject. Distorts light, creates reflections, adds another surface for issues.
Water absorbs and scatters light. Colors look different underwater than in air, especially reds.
Moving subjects. Fish rarely pose; they swim. Catching them in focus is challenging.
Lighting from above only. Most photos want light from in front; tank lighting comes from above, casting shadows.
Reflections everywhere. Room lights, your own reflection, ambient light all bounce off the glass.
Bright tank, dark surroundings. Strong contrast between tank interior and room creates exposure problems.
Each of these has a solution; combined, they make aquarium photography distinctly tricky.
Camera Choices
You can photograph aquariums with various devices:
Smartphones
The most accessible. Modern smartphones (iPhone Pro, Samsung S, Google Pixel) take impressive photos.
Pros:
- Always available
- Modern phones handle low light decently
- Easy sharing
- Many apps for editing
Cons:
- Small sensors struggle with mixed lighting
- Less control over settings
- Can't change lens
- Auto-focus sometimes struggles with fish
Best practices for phone photos:
- Clean the lens (often missed; affects everything)
- Tap to focus on the subject (don't trust auto)
- Adjust exposure compensation (slide down on iPhone, etc.)
- Use "Pro" or manual mode if available
- Hold steady or use a small tripod
- Shoot in burst mode for fast subjects
Mirrorless / DSLR Cameras
The serious choice. Interchangeable lens cameras with manual controls.
Pros:
- Significantly better image quality
- Full manual control
- Better in low light
- Can use macro lenses for tight close-ups
- RAW format for advanced editing
Cons:
- Cost ($500-2000+ for body + lens)
- Learning curve
- More gear to manage
Recommended setup for aquarium photography:
- Mirrorless or DSLR body (Sony Alpha, Fuji X, Canon R, Nikon Z)
- 50-100mm prime lens (for general aquarium shots) OR macro lens (for close-ups)
- Tripod
- Polarizing filter (optional)
- Remote shutter or timer
Action Cameras
For underwater perspectives. GoPro and similar.
Pros:
- Waterproof
- Underwater shots possible
- Stabilized video
Cons:
- Limited still image quality
- Wide-angle limits composition
- Less suited to general aquarium photography
Most aquascape photography uses standard cameras outside the tank, not action cameras inside.
Fundamental Settings
For manual cameras, the basics:
Aperture (f-stop)
Controls depth of field (how much is in focus) and light.
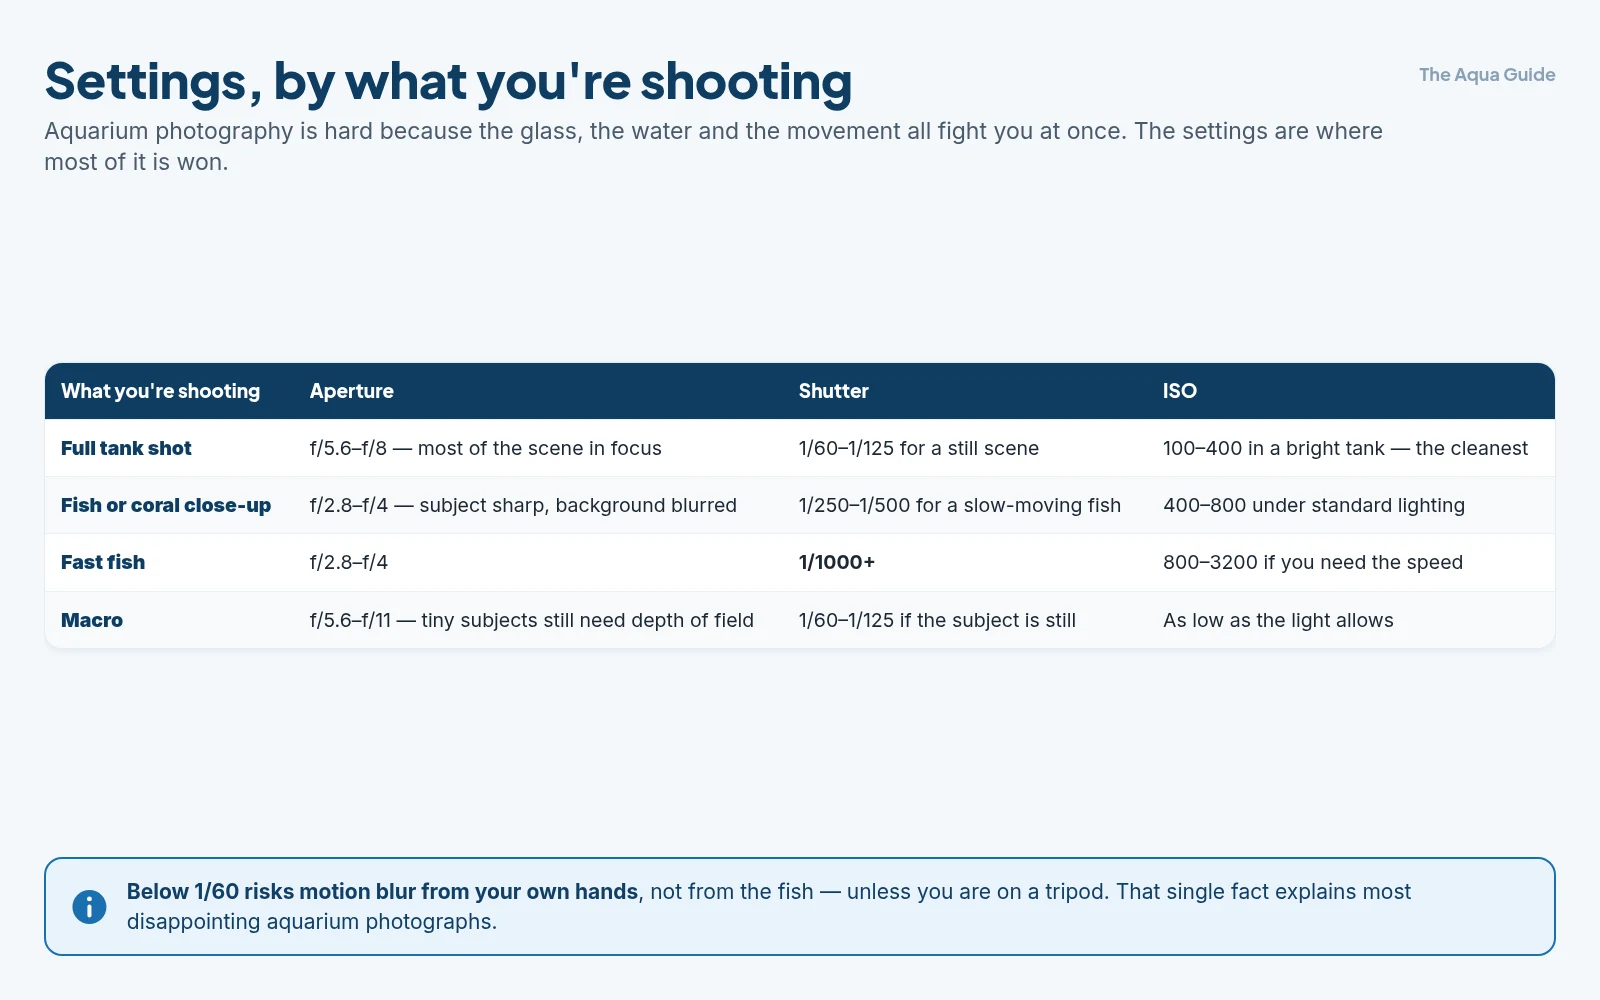
For full tank shots: f/5.6-f/8 — most of the scene in focus
For fish or coral close-ups: f/2.8-f/4 — subject in focus, background blurry
For macro: f/5.6-f/11 — need depth of field for tiny subjects
Shutter Speed
Controls motion. Faster = freezes action; slower = motion blur.
For still subjects (corals, plants): 1/60-1/125 second
For slow-moving fish: 1/250-1/500 second
For fast fish: 1/1000+ second
Below 1/60 risks motion blur from your own hands unless using tripod.
ISO
Camera's sensitivity to light. Higher ISO = more sensitivity but more grain/noise.
Bright tanks: ISO 100-400 (cleanest)
Standard lighting: ISO 400-800
Dim setups or fast shutter needed: ISO 800-3200
Modern cameras handle ISO 1600-3200 well; older or smaller-sensor cameras need lower ISO.
White Balance
Critical for accurate colors. Tank lighting has specific color temperature.
Manual white balance:
- Photograph a white surface in the tank lighting
- Use the camera's custom white balance feature
- This calibrates colors to your specific lighting
Auto white balance works decently but often shifts colors slightly. Manual is better for serious work.
The Setup Shot Process
For full-tank "scape shots":
1. Clean the glass. Inside and outside. Both surfaces. Algae, calcium spots, dust — all show in photos.
2. Turn off room lights. Eliminates reflections from outside the tank.
3. Maximize tank lighting. Sometimes turn lights up beyond normal for better photos.
4. Position the camera straight on. Avoid shooting at angles unless intentional.
5. Square the camera to the glass. Slight tilts cause distortion.
6. Use a tripod. Steady shots, longer exposures possible, repeatable angles.
7. Wait for the right moment. Fish in good positions, corals fully extended (some are best photographed in evening when they're more open).
8. Take multiple shots. Composition variations, timing variations — pick the best afterward.
9. Consider time of day. Some tanks photograph best mid-photoperiod, others late afternoon. Experiment.
Lighting Tricks
A few specialized techniques:
Glass Reflections
Reflections of you, the room, or behind the camera show up easily.
Solutions:
- Dark cloth between camera and tank (with hole for lens)
- Photograph in a darkened room
- Use polarizing filter on lens
- Position yourself directly in front of the tank, not at angles
Avoiding Camera in Reflection
The dreaded "camera selfie" in the glass.
Solutions:
- Get very close to the glass (the camera disappears below the tank rim)
- Dark cloth tunnel
- Use a longer lens from further back
Backlight Issues
Tank lighting from above creates harsh top lighting on subjects.
Solutions:
- Time photos when natural side lighting helps
- Use a small additional light source from the front
- Position the camera to use the light angle creatively
Photographing Fish
The hardest aquarium photography subject.
Techniques:
Wait for behavior peaks. Feeding time often gets fish active and in good positions.
Anticipate movement. Watch how fish typically swim; pre-focus on their likely paths.
Use burst mode. Modern cameras shoot 5-20 frames per second. Pick the best later.
High shutter speed. 1/500 minimum for active fish; 1/1000+ for fast ones.
Continuous autofocus. Tracks moving subjects.
Pre-focus tricks: Focus where you expect the fish to be; press shutter when it arrives.
Photograph during their "patrol" times. Many fish have predictable behaviors at certain times of day.
Plan your composition. Decide where the fish needs to be for a good shot; wait for it to get there.
Photographing Corals
Corals are stationary but have specific challenges.
Techniques:
Color accuracy. Use manual white balance for accurate colors. Many corals look very different in photos than in person without correction.
Macro mode. Get close to show texture and detail.
Photograph in the evening when polyps are fully extended.
Use a tripod. Long exposures possible since corals don't move.
Consider the "blue" effect. Many reef tanks are photographed with heavy blue lighting; this looks dramatic but also exaggerates fluorescence. Some keepers prefer more natural white-balanced shots.
Stack focus. For ultra-detailed shots, take multiple photos at different focus points; combine in editing.
Photographing Plants and Aquascapes
Easier than fish but with their own considerations.
Techniques:
Wait for pearling. During strong photosynthesis, plants release oxygen bubbles. Catching this is striking.
Photograph trimmed scapes. Right after pruning when plants look their best.
Avoid bubbles in water. Stop the filter for a few minutes; let water clear of fine bubbles.
Wait for fish to be in position. Fish in the right spot add life to scape shots.
Photograph at the same time daily. For "evolution" series showing how the tank changes.
Editing
Post-processing dramatically improves results.
Basic Edits Most Photos Benefit From
Exposure adjustment. Brighten if too dark; rarely darken (aquariums shouldn't look gloomy).
White balance correction. If you didn't get it right in camera.
Contrast. Slight boost makes images "pop."
Saturation. Slight increase enhances colors without making them artificial.
Sharpness. Slight sharpening enhances detail.
Crop and straighten. Most photos benefit from cropping; ensure horizontal lines are level.
Advanced Edits
Lightroom or Photoshop: Full manual control over every aspect
Phone editing apps: Snapseed, VSCO, Lightroom Mobile work well
Specific aquarium edits:
- Remove dust spots from glass
- Fix small reflections
- Adjust individual colors (boost reds underwater that look muted)
- Stack focus for sharper images
Don't over-edit. A common beginner mistake — saturated colors and heavy effects make photos look amateur. Subtle adjustments look professional.
Composition for Aquariums
Many of the same principles from aquascape design apply to photographing those scapes:
Rule of thirds. Apply to your composition framing, not just the scape.
Lead the eye. Compose so the eye moves through the photo naturally.
Don't crop too tight. Give the scape room to breathe.
Watch the edges. Stray plant leaves, equipment, weird crops.
Multiple compositions. Wide shots, medium shots, details. Each tells a different story.
Sharing and Documenting
Once you have good photos:
For online sharing:
- Resize for the platform (1080px wide is common for Instagram)
- Add metadata if relevant
- Tag appropriately for discoverability
For documentation:
- Date each photo
- Keep an organized library by tank/setup/date
- Take consistent shots over time for evolution series
For competitions:
- Many aquascape contests have specific photo requirements
- Read submission guidelines carefully
- Consider professional editing or assistance for serious entries
Common Beginner Mistakes
Phone too close to glass at angles. Causes distortion and weird reflections.
Dirty glass or lens. Affects every photo.
Using zoom (digital) instead of moving closer. Always move physically; digital zoom degrades quality.
Flash on the glass. Causes bright reflections that ruin photos.
Not waiting for the moment. Take time — fish in the wrong position make uninteresting shots.
Auto white balance. Color temperatures from aquarium lights confuse cameras.
Over-edited photos. Subtle adjustments look professional; heavy edits look amateur.
Single shot only. Take many; pick the best.
The Bottom Line
Aquarium photography combines specific challenges (glass, water, moving subjects, lighting issues) requiring specific techniques. Camera choice: phone for casual sharing (clean lens, tap to focus, burst mode for fish); mirrorless/DSLR for serious work (manual control, better in low light, RAW format). Key settings: aperture (f/5.6-8 for tank shots, wider for close-ups), fast shutter for fish (1/500+), low ISO for noise control, manual white balance for color accuracy. Setup process: clean glass thoroughly, darken room, square camera to tank, use tripod, photograph multiple compositions and timings. Specific techniques for fish (burst mode, high shutter speed, anticipate behavior), corals (manual white balance, evening photography when polyps extended, macro for detail), and plants/scapes (wait for pearling, post-trim, fish in position). Edit subtly — exposure, white balance, slight contrast and saturation — avoid over-editing. The skill develops with practice; expect first attempts to be unimpressive. Within a few months of regular photography, results improve dramatically. Worth the effort for anyone documenting their tank, sharing online, or entering competitions. A well-photographed aquascape can look as beautiful as it does in person — sometimes more, when the photographer captures moments the casual eye misses.
Related guides
- Composition and design principles in aquascaping
- Aquascaping for beginners
- Aquascape maintenance and evolution over time
- Aquarium lighting basics: brightness and photoperiod
- Aquascape styles: nature, iwagumi, Dutch, jungle
- Introduction to saltwater aquariums
- Setting up your first aquascape, step by step
- Advanced aquarium topics
Got questions about your specific setup? Drop them in our Community Forum — we love helping new fishkeepers get started right.