The single biggest factor separating ordinary planted tanks from competition-level aquascapes isn't lighting, plants, or substrate — it's CO2. Plants need carbon dioxide for photosynthesis, and in still water tanks, available CO2 is the limiting factor for growth. Add supplemental CO2 and everything changes: plants grow faster, denser, more vibrantly, and the demanding carpet plants and reds become achievable. Here's the complete guide to CO2 injection, when to use it, and the systems that deliver it.
At a glance: do you need it?
| If your tank is... | Then... |
|---|---|
| Hardy plants, standard light | No. They grow perfectly well on the CO₂ already dissolved from fish respiration |
| Running carpets or demanding species | Yes. This is what pressurised CO₂ is for, and the usual reason a carpet fails without it |
| High light, but no CO₂ and no fertiliser | Fix that imbalance first. More light without matching carbon and nutrients feeds algae, not plants |
| On a budget, but curious | DIY yeast will show you the effect — but accept that the output drifts, and drift causes its own problems |
CO₂ is an enthusiast tool, not a requirement. Plenty of beautiful low-tech planted tanks run with none at all.
Why CO2 Matters for Plants
A few biology facts that explain everything else:
Plants make food from CO2 + water + light (photosynthesis). They take in CO2, combine it with water using light energy, and produce sugars for growth.
Aquarium water has limited dissolved CO2. Atmospheric exchange at the surface provides some, fish respiration adds a bit more, but typical tank CO2 levels are around 3-5 mg/L. Plants can use far more — most thrive at 20-30 mg/L.
Light and nutrients matter, but CO2 is usually limiting. You can max out your lighting and dose plenty of fertilizer, but if CO2 is the bottleneck (which it usually is), plants can't fully use those resources.
Result: Adding CO2 to a properly lit, fertilized tank dramatically accelerates plant growth, intensifies colors (especially reds), enables carpeting plants to thrive, and produces the lush aquascapes you see in competitions.
What CO2 Does to a Tank
After adding pressurized CO2 to a previously low-tech tank, expect:
2-4x faster plant growth. Stem plants that grew an inch a week now grow several inches. Trimming becomes weekly.
Denser plant masses. Plants fill in completely rather than staying sparse.
More vibrant colors. Reds become saturated; greens become richer.
Better algae resistance — fast-growing plants outcompete algae for nutrients.
Carpet plants succeed — HC Cuba, monte carlo, dwarf hairgrass, glossostigma all become viable.
Pearling — plants visibly release oxygen bubbles when photosynthesizing, creating the magical "pearling" effect.
Higher maintenance demands — fast growth means more pruning, more fertilizer demand, more attention.
The transformation is dramatic and obvious. Plants that struggled now thrive.
The Three Methods
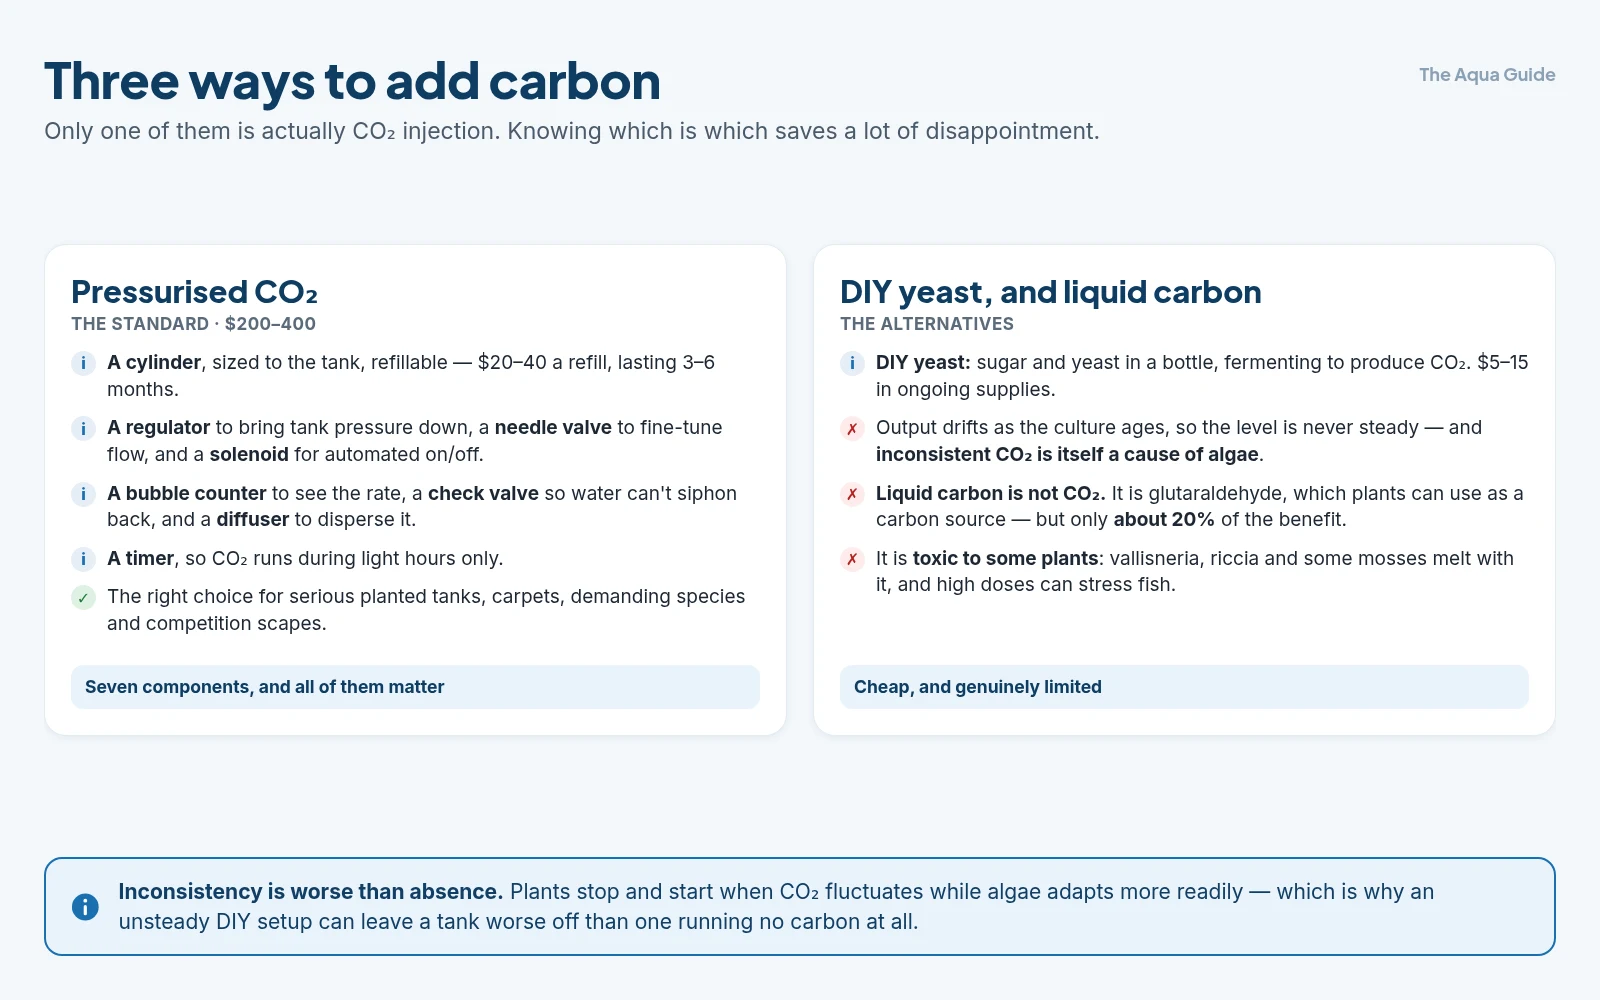
Method 1: Pressurized CO2 (The Standard)
The serious solution. A pressurized CO2 cylinder regulated to feed the tank in controlled amounts.
Components needed:
- CO2 cylinder — refillable, sized to your tank (small 5lb for small tanks, larger for bigger setups)
- Regulator — reduces high-pressure tank gas to usable low pressure
- Needle valve — fine-tunes the flow rate
- Solenoid valve — automated on/off via timer
- Bubble counter — visual confirmation of flow rate
- Check valve — prevents water from siphoning back into the system
- Diffuser — disperses CO2 into the water (ceramic diffusers, inline atomizers, reactors)
- CO2 timer — runs CO2 during light hours only
Cost: $200-400 for the system; $20-40 per cylinder refill (lasts 3-6 months in typical setups).
Pros:
- Precise control of CO2 levels
- Consistent, reliable delivery
- Achievable target CO2 of 20-30 mg/L
- Industry standard — abundant troubleshooting info
Cons:
- Significant upfront cost
- Ongoing refill expense
- Risk of "CO2 dump" (sudden spike) if equipment fails — can be lethal to fish
- Cylinders need transport for refilling
This is the right choice for: Serious planted tank keepers, anyone running carpet plants or demanding species, aquascape competitors.
Method 2: DIY Yeast CO2
The budget alternative. Sugar + yeast in a bottle ferments to produce CO2.
Process:
- Mix sugar, water, and yeast in a 2-liter bottle
- Yeast eats sugar, produces CO2 as byproduct
- Run an airline tube from the bottle to a diffuser in the tank
- CO2 generation runs for 2-3 weeks before yeast dies and bottle needs refreshing
Cost: $5-15 for ongoing supplies (sugar, yeast, bottles).
Pros:
- Very cheap
- Surprisingly effective for small tanks (10-30 gallons)
- No risk of pressurized cylinder issues
- Good way to test whether CO2 transforms your tank before investing
Cons:
- Inconsistent output — production peaks then declines
- No on/off control — runs 24/7, which can suffocate fish at night
- Frequent refilling required (every 2-3 weeks)
- Limited capacity — not enough for larger tanks (50+ gallons)
- Messy — yeast solution can clog tubing
Workable for: Small to medium tanks, budget-conscious beginners experimenting with CO2.
Method 3: Liquid Carbon (Not Really CO2)
Products like Seachem Excel, API CO2 Booster, EasyCarbo are not actually CO2 but rather liquid carbon compounds (glutaraldehyde) that plants can use as a carbon source.
Pros:
- No equipment needed beyond the bottle
- Algae-killing side effect (especially against BBA)
- Cheap and convenient
- Works in low-tech tanks
Cons:
- Much less effective than real CO2 — provides maybe 20% of pressurized CO2's plant benefits
- Toxic to certain plants — vallisneria, riccia, some mosses melt with liquid carbon
- Can stress fish at high doses
- Ongoing expense (daily dosing for a 75-gallon tank gets expensive)
Workable for: Low-tech tanks wanting modest plant boost, algae spot-treatment, situations where pressurized CO2 isn't feasible.
Setting Up a Pressurized CO2 System
The general installation:
1. Place the cylinder. Usually in a stand cabinet or beside the tank. Upright, secure, ventilated.
2. Attach the regulator to the cylinder. The regulator's high-pressure gauge shows cylinder pressure (usually 800-1000 psi); the low-pressure gauge shows working pressure (usually 20-40 psi).
3. Connect the needle valve to the regulator output. This is what you'll adjust to control flow.
4. Add the solenoid valve (often integrated with the regulator). This is the electronically-controlled on/off — plug it into a timer aligned with your lights.
5. Run airline tubing from the solenoid out to the tank.
6. Install a check valve in the line near the tank — prevents water siphoning back if pressure drops.
7. Connect a bubble counter between the check valve and diffuser. You'll see CO2 bubbling through water in this device, confirming flow.
8. Place the diffuser in the tank, usually opposite the filter outflow so dissolved CO2 distributes through the tank. Ceramic disc diffusers are most common; inline atomizers (in the filter return line) work for advanced setups.
9. Connect everything via timer — solenoid + lights both on a timer, both come on about 1 hour before lights, both turn off 1-2 hours before lights end.
Dialing In CO2 Levels
Getting CO2 right takes adjustment.
Target: 20-30 mg/L dissolved CO2 during lights-on period.
Testing methods:
- Drop checker — small bulb in the tank with pH indicator solution; green = good, blue = too low, yellow = too high. Slow-responding but reliable.
- pH/KH measurement and chart — compare pH and carbonate hardness to a CO2 chart to estimate dissolved CO2. More precise but requires accurate KH measurement.
Process:
- Start with conservative bubble count — 1-2 bubbles per second for a 20-gallon tank, 3-5 for a 40-50 gallon.
- Run for a week; observe fish behavior closely.
- Check drop checker color or calculate CO2 from pH/KH.
- Increase gradually — small adjustments to needle valve — over weeks.
- Watch for fish stress (gasping at surface, lethargy) — back off immediately if seen.
Fish stress symptoms to watch for:
- Gasping at the surface
- Hovering near filter outflow (more oxygen)
- Lethargy or hiding
- Rapid gill movement
Any of these — reduce CO2 immediately. CO2 toxicity kills fish quickly.
CO2 Schedule
A typical daily schedule for a CO2-injected tank:
- 6 AM: Photoperiod begins. Hour before lights — CO2 starts coming on.
- 7 AM: Lights on. CO2 already at target level.
- 3-4 PM: Lights off in 1-2 hours. CO2 begins to taper.
- 5 PM: CO2 off. Lights off.
- Overnight: Tank breathes naturally, CO2 levels return to baseline by morning.
This schedule ensures CO2 is available during plant photosynthesis but not building up overnight when plants don't use it (and produce CO2 themselves).
Common CO2 Problems
Fish gasping at surface. CO2 too high. Reduce bubble rate.
Drop checker stays blue (no CO2). Bubble rate too low; diffuser may be clogged.
Drop checker stays yellow (excess CO2). Reducing too late; back off bubble rate substantially.
Wildly fluctuating CO2. Probably a regulator or solenoid issue; check seals and connections.
Slow CO2 dissipation. Try a different diffusion method — inline atomizer or reactor distributes more efficiently than ceramic disc.
CO2 only works at one end of tank. Increase circulation; place diffuser opposite filter intake.
Plants not responding despite CO2. Check other factors: light intensity, fertilizer, water quality.
Safety Considerations
Pressurized CO2 systems carry some risk:
- CO2 dump (sudden full-pressure release) is unlikely but lethal to fish. Quality regulators have anti-dump features.
- Cylinder rupture is extremely rare with proper care but catastrophic if it happens. Secure cylinder, don't drop, refill from reputable sources.
- Personal CO2 inhalation — in well-ventilated areas, no concern; in tightly enclosed spaces, very high concentrations could be dangerous.
Most keepers run CO2 safely for years. Reasonable precautions handle the small risks.
When NOT to Use CO2
Some scenarios where skipping CO2 is correct:
- Low-light planted tanks — CO2 would create algae issues without enough light for plants to use it.
- Fish-focused tanks — if your priority is keeping fish, CO2 is unnecessary and adds risk.
- Shrimp-only tanks — sensitive to fluctuations; many keepers avoid CO2 in shrimp colonies.
- Inconsistent maintenance — CO2 systems need regular monitoring; sporadic care creates problems.
- Vacation concerns — extended absences are riskier with CO2 systems.
The Bottom Line
CO2 injection transforms planted tanks: 2-4x faster growth, denser plant masses, vibrant colors, viable carpet plants, and the lush look characteristic of competition aquascapes. Three methods: pressurized CO2 (the standard — $200-400 setup, precise control, target 20-30 mg/L), DIY yeast CO2 (cheap experimental approach for small tanks), and liquid carbon (Excel/Booster — much weaker than real CO2 but useful for low-tech and algae control). For serious planted tanks, pressurized is the only path; for experimentation or budget tanks, alternatives have a role. Setup involves cylinder, regulator, needle valve, solenoid, bubble counter, check valve, and diffuser — connected through a timer aligned with lights. Dial in slowly via drop checker observation; watch for fish stress (gasping, lethargy) and reduce immediately if seen. Skip CO2 if your goals don't justify it — low-tech tanks done well are still beautiful, and CO2 is a tool, not a requirement. When justified, the visual results are dramatic and unmistakable.
Related guides
- Do I need CO₂, fertiliser and special lighting?
- Advanced fertilisation: dosing methods for planted tanks
- Aquarium lighting basics: brightness and photoperiod
- Floating and carpeting plants for beginners
- Hair, thread and string algae control
- Aquarium plants quick reference
- The beginner's guide to live aquarium plants
- Aquascape styles: nature, iwagumi, Dutch, jungle
Got questions about your specific setup? Drop them in our Community Forum — we love helping new fishkeepers get started right.